
About the Eka dolls
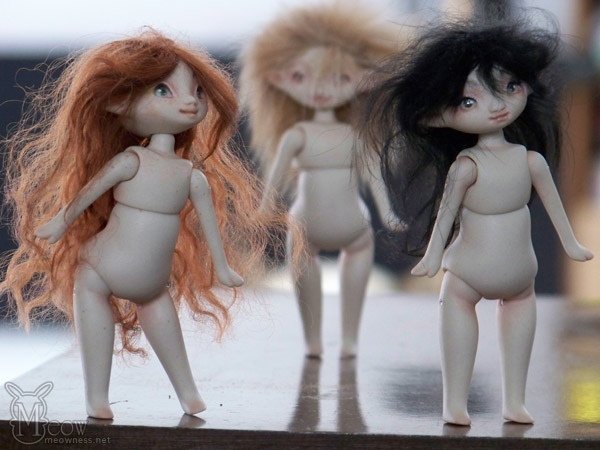
The Eka dolls are a limited series of 25 porcelain dolls.
These dolls are made from slip cast porcelain that is strung together with elastic cord and metal pins.
They are painted with china paint that is fired on to the porcelain at a temperature of 1260 to 1322 F.
Most of them are 9.5cm tall but the first three that were made are 10cm tall. The difference in height was due to the fact that the first three dolls were made with a different brand of porcelain slip that had a lower rate of shrinkage.
The original sculpture that was used to make the molds was made from polymer clay and wood beads.
About the idea and inspiration
I've wanted to make porcelain dolls for a very long time so in part these little Ekas were a way to practice and become more familiar with the medium. There's only so much that can be learned from reading and sometimes practice and repetition is the most important part of learning. I had made a few doll heads before starting on these, and even took a class on how to paint doll faces, but for the most part they never became completed dolls and I needed something simple but still somewhat challenging to push myself. I also wanted to make jointed dolls so a small and simple doll with a very limited number of joints seemed like a reasonable starting point. Also by choosing to do a limited series of these dolls I've basically forced myself to finish a certain number and then move on to something new.
Initially when I first started thinking about making dolls I thought I would make soft bodied dolls where only the head, hands, and feet were made of porcelain but years later I learned about Asian ball jointed dolls and then about a year after that I started seeing ball jointed dolls that were also made from porcelain and other ceramics. I like the idea of ball jointed dolls better then soft bodied dolls because they just seem more dynamic and versatile.
Initially when I first started thinking about making dolls I thought I would make soft bodied dolls where only the head, hands, and feet were made of porcelain but years later I learned about Asian ball jointed dolls and then about a year after that I started seeing ball jointed dolls that were also made from porcelain and other ceramics. I like the idea of ball jointed dolls better then soft bodied dolls because they just seem more dynamic and versatile.
More about the process
The little doll started out with a pencil sketch. The design was mostly inspired by manga chibi drawings and kewpie dolls. I planned on making a very simple doll and only wanted joints at the hip, shoulder, neck, and one on the abdomen. This way I could get a tiny bit of practice in with making joints but have it be simple enough that it's not the main focus of my attention. Basically the simple joint work would allow me more time to concentrate on how to cast, clean, and finish porcelain.
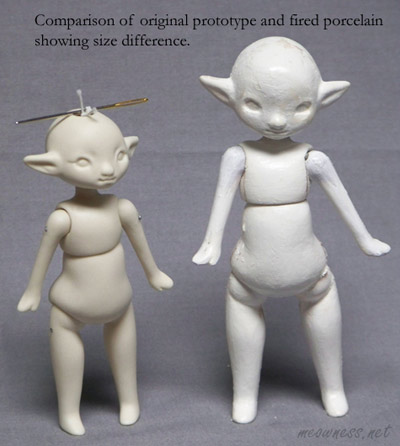
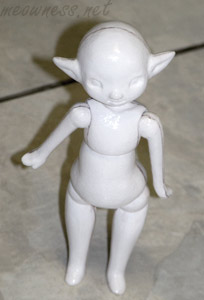 A prototype was then sculpted out of polymer clay and wood beads for the joint balls. The prototype was sculpted solid so there was no way to string the doll together. This was okay only because the joints were so simple.
I then drew parting lines on the prototype, these lines were to help me know where the mold parts should be, and then sealed all the pieces to prepare them for molding. Making molds is an art all its own so being able to get more practice with this was also good.
The molds came out rough and were not without defect but for my purposes they were functional enough. They had to sit and dry for several days before I could cast porcelain doll parts with them.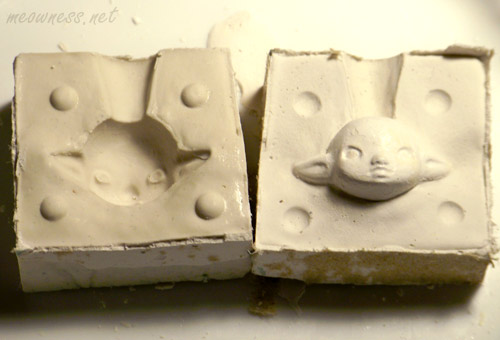
Casting porcelain is not as difficult as some people would lead you to believe but it does have its quirks. The slip needs to be the right consistency and you can't pour too slowly into the molds. Care also needs to be taken when taking the parts out of the molds. If the soft porcelain is warped or torn before drying you can try to fix it but chances are it'll just warp or crack again when it's in the kiln.
While the porcelain is still wet I clean up the seem-lines and such left by the mold and also work on carving the dolls face. The mold for the Eka head had very little detail in the face and some pretty bad air bubbles so I have to carve a new face directly in porcelain for each doll. This is alright though since I like that each doll gets her own face.
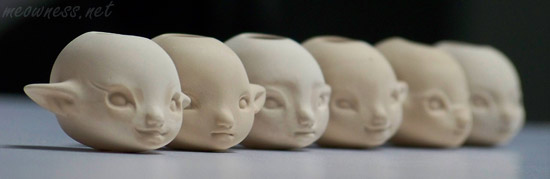
 After a bit of light cleaning and face carving all of the body parts then take a trip to the kiln to undergo what is called a soft firing. This soft firing allows the porcelain to harden slightly but not fully cure. The purpose of this is so the parts can be further cleaned and refined without being quite so soft. They can now be submerged in water for wet sanding. The wet sanding is a long and tedious process but it makes the surface of the doll parts nice and smooth and doesn't create any nasty dust.
Once all the doll parts are clean and smooth its back to the kiln again. This time they are going to be high fired to a temperature of 2232 F. That's pretty hot! The high temperature causes the porcelain to vitrify and take on glass-like characteristics. The high temperature also causes the porcelain to shrink. After they come out of the kiln they have to be cleaned again to scrub off the grit that is left after the firing.
Now that all the casting and cleaning is finished it's finally time to start on the painting. All of the Eka dolls are painted with china paints that need to be applied in layers with each layer being fired in the kiln. It's a long process, since it takes several hours for the kiln to fire and cool for each layer of paint, but the end result is paint that is permanently bonded to the porcelain. No worry of scratches or fading.
Once all the pieces are painted the doll is finally near completion. Next step is to epoxy glue metal pins in the joints and string it all together using elastic. She then just needs some hair and maybe some clothes (though probably not since I still haven't ventured into sewing much) and she's all done!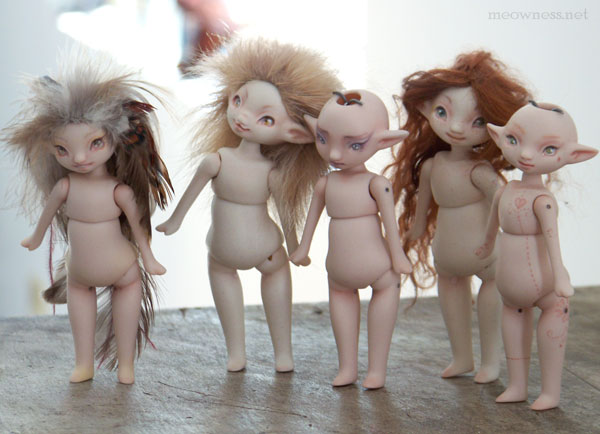
A prototype was then sculpted out of polymer clay and wood beads for the joint balls. The prototype was sculpted solid so there was no way to string the doll together. This was okay only because the joints were so simple.
I then drew parting lines on the prototype, these lines were to help me know where the mold parts should be, and then sealed all the pieces to prepare them for molding. Making molds is an art all its own so being able to get more practice with this was also good.
The molds came out rough and were not without defect but for my purposes they were functional enough. They had to sit and dry for several days before I could cast porcelain doll parts with them.
Casting porcelain is not as difficult as some people would lead you to believe but it does have its quirks. The slip needs to be the right consistency and you can't pour too slowly into the molds. Care also needs to be taken when taking the parts out of the molds. If the soft porcelain is warped or torn before drying you can try to fix it but chances are it'll just warp or crack again when it's in the kiln.
While the porcelain is still wet I clean up the seem-lines and such left by the mold and also work on carving the dolls face. The mold for the Eka head had very little detail in the face and some pretty bad air bubbles so I have to carve a new face directly in porcelain for each doll. This is alright though since I like that each doll gets her own face.
After a bit of light cleaning and face carving all of the body parts then take a trip to the kiln to undergo what is called a soft firing. This soft firing allows the porcelain to harden slightly but not fully cure. The purpose of this is so the parts can be further cleaned and refined without being quite so soft. They can now be submerged in water for wet sanding. The wet sanding is a long and tedious process but it makes the surface of the doll parts nice and smooth and doesn't create any nasty dust.
Once all the doll parts are clean and smooth its back to the kiln again. This time they are going to be high fired to a temperature of 2232 F. That's pretty hot! The high temperature causes the porcelain to vitrify and take on glass-like characteristics. The high temperature also causes the porcelain to shrink. After they come out of the kiln they have to be cleaned again to scrub off the grit that is left after the firing.
Now that all the casting and cleaning is finished it's finally time to start on the painting. All of the Eka dolls are painted with china paints that need to be applied in layers with each layer being fired in the kiln. It's a long process, since it takes several hours for the kiln to fire and cool for each layer of paint, but the end result is paint that is permanently bonded to the porcelain. No worry of scratches or fading.
Once all the pieces are painted the doll is finally near completion. Next step is to epoxy glue metal pins in the joints and string it all together using elastic. She then just needs some hair and maybe some clothes (though probably not since I still haven't ventured into sewing much) and she's all done!